
What Are Clay Canes? Have you ever seen those candies with the teeny tiny images in them? Or clay work that looks like there’s an image built right into it (not just painted on)? These are probably using a technique called cane making! It’s essentially the process of building a larger image with your material and condensing it down into a long cane form where you would then slice into it to reveal the image in a smaller format. Keep reading to learn how I make my own clay canes!

Step 1: Make Your Template

- Take a piece of paper and draw the image you want made into a cane (or you can print an image). I would recommend making it at least a few inches big because it will make blocking out the colors in clay easier.
- The simpler the image the better! If you want to make a more complicated image then I would suggest making your template larger to accommodate the extra details.
- TIP: For a more simpler experience when you get to the step of making the actual cane I suggest you make your template as a circle as that makes it a lot easier to roll down to the cane.
- TIP: If you want to use this paper template more than once then a great way to preserve it from the oils of polymer clay is to laminate it. I just use regular clear packing tape on the front and back.
Step 2: Prep Your Clay

- Roll out all the clay colors you need to make your image into the same depth.
- The thicker the clay the quicker it will be to block out your image.
- Cut into 1 inch strips.
Step 3: Build Your Clay Piece

- Now it’s time to actually build out your image! Take your clay strip and start matching it to your template.
- Take your time to cut pieces and blend edges together. Don’t worry if it’s not perfectly smooth either, the lines you see from the strips will blend together when you squeeze the image down.
Step 4: Roll Your Cane
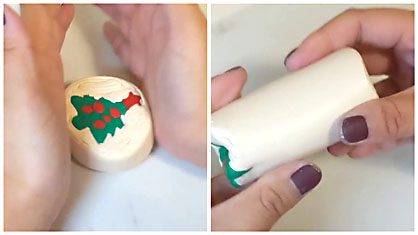
- Once you’re happy with your larger clay image then it’s time to start the caning process.
- With the palms of your hand start to squish the sides of your clay in, rotating as you go so all sides are being squished.
- Keep this process going and you will start to notice it becoming taller and smaller. Eventually it will get to a size where you can turn it on the side and roll it out even more.
- Stop rolling once you hit the size you’re happy with.
Step 5: Cut Into The Cane

- Take your cane and put it into the fridge for about 10-15 minutes in order to firm up. This is helpful because it will make sure then you slice into it that the image doesn’t get all smushy.
- Now is the time where you cross your fingers that the image turned out well! Take your can out and with your tissue blade cut in the middle of your cane to reveal your image.
- TIP: You’ll also notice the front and back ends of your cane will look very off and that’s totally normal. You can just cut those ends off until you reach a point where the cane image is usable. Save this clay to mix for future projects!
And there you have it! You can then continue slicing your cane.

Here’s what you can then do with these cane slices with your clay jewelry:
- Add texture to make little fake cookies. I squish the cut piece a bit more and use a toothbrush to add texture. And then with a brush I add some powder pigment to give it that baked look.
- You can use the cut piece as is! Add a screw pin to the top to make cute little dangles.
- Made into beads by using a bead pin to pierce through the sides. 4. Layer onto another layer of clay and roll the cane slice into it and cut out using a clay cutter.
- You can use the cut piece as is! Add a screw pin to the top to make cute little dangles.
- Made into beads by using a bead pin to pierce through the sides.
- Layer onto another layer of clay and roll the cane slice into it and cut out using a clay cutter.
If you give this technique a try be sure to share on your socials with the tags #HowDoYouSculpey and any clay products you used like #premo #souffle #liquidsculpey
