
This is Krithika, and today I want to talk to you about the different ways I like to finish my pieces once they’re cured. I use a variety of techniques and products depending on the situation. Finishing your piece is one of the most vital parts of the construction! Read on to find out how I decide what to use!
- Leaving it au naturel
This is the simplest thing I can do! Polymer clay that has no surface treatments does not need to be sealed. Pure polymer clay that has been cured correctly is very durable. Make sure the clay surface is smooth and devoid of any unwanted fingerprints and enjoy the beauty of clay. I made this pendant by layering swirl cane slices of a sheet of clay. I burnished it carefully with some patty paper, cut it out and cured it. The unvarnished clay surface works beautifully here. I also have a pendant with a silkscreened image. The paint has been baked on the clay and is quite resistant to scratches.

2. Make the glitter shine (more!)
If you want to amp up the shine on any surface, buffing or varnishing are the way to go. Any time I use one of the glitter clays from Premo, I always use a shiny coat of some kind. Same goes for mica powder. The image shows some flat pieces that have color shifting pigments applied over a stencil onto black clay. Once baked, I added some doming UV resin on top to bring out the bling!

While two part resin or UV resin will work flat surfaces, they don’t work very well for curved surfaces. DeepShine from TinyPandora will work for these.
3. What can be more compatible with polymer clay than clay?!
Another great option for a shiny coat or varnish is Liquid Sculpey Clear. I make sure I give the liquid clay a good stir in the bottle and use a paintbrush to apply a thin coat over the piece. Sometimes I pop it into the oven with the rest of my clay and hit it with a heat gun as soon as it’s out. It takes just a few seconds to bring out the shine this way. Or if I don’t have a batch of clay going into the oven, I simply use my scrapbooking heat gun to cure it. You could also use a commercial heat gun to do this faster.

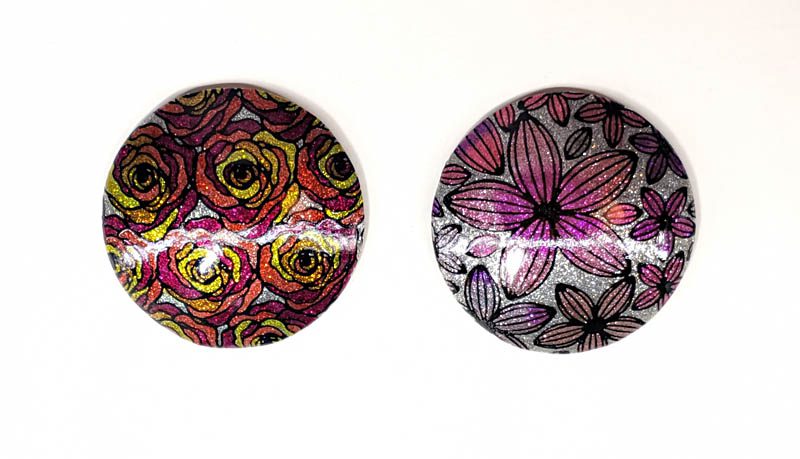
You can see a pair of glitter clay domes here with a silkscreened and colored image glazed with liquid clay. I wanted to include the before and after picture to illustrate how a shiny coat really brings out the glitter!
4. What about other varnishes and glazes?
Any time I make something that has a surface treatment like a paste or mica powder, I always add a coating to protect it. This is especially true if the additives are on exposed top surfaces where it is prone to rub off due to friction. A common example is a surface with texture where I’ve highlighted the top spots with mica powder, like the pendant here. I used Minwax Polyurethane to coat the surface. I could have used liquid Sculpey here as well, but since that’s a little thicker, it’s more difficult to coat a textured surface like this.

Make sure to use water-based varnishes that are clay compatible, like the Sculpey Glaze and Minwax Polyurethane. When in doubt always test the product you want to use on some scrap clay
5. About that sanding and buffing though
If everything I’ve said so far sounds like ways to avoid sanding and buffing, it’s partly true! I work with a lot of surface treatments, so I usually can’t sand the clay without ruining the surface. I also use a lot of liquid clay or resin to add shine when I need it. But there are times when I will take a deep breath and put in the time to sand and buff. Translucent clay and any clay containing mica (pearl clay or metallics) will respond wonderfully to sanding and buffing. Here’s a mica shift piece and a simple cabochon made with bits of mica clay chopped roughly and smashed together. Taking the mica shift piece through several grits of sandpaper smoothed out the lumpy surface. Buffing brought out a warm glow. Varnishing the rough surface would have simply highlighted the rough surface.

This should give you a rough idea of how I decide what finishing technique to use on a piece. Of course, these are not hard and fast rules. You can experiment and decide what works best for you. You could sand and buff every piece after adding a layer of translucent clay or liquid clay on any surface treatment. Or you could coat every surface with resin or clear liquid Sculpey. Work with these options and come up with your own system!
