
I’ve always loved to paint and draw, and before working with polymer clay, I used to fill my creative time by painting in oil and acrylic paints and drawing with charcoal and chalk pastels. When I started using polymer clay, I was thrilled to learn that I could still use all those supplies with my clay, and for me, it felt like the natural thing to do.
There are many tutorials showing us how to use these products to create some beautiful surface techniques, and I see many artists creating some gorgeous veneers, slabs, and jewellery pieces. So, it surprised me to learn that so many of us are nervous of using paints and powders on our sculpture work.
It can be a little scary painting a full sculpture for the first time, and it can take some practice, but you don’t need to completely paint a piece. Start small and use these products to enhance the colour of your clay. A little will go a very long way.
In the picture of the head pen pots above, you can see how acrylic paint has been used to stain and enhance the natural colour of the Super Sculpey beige clay, while still being able to see the colour of the clay.
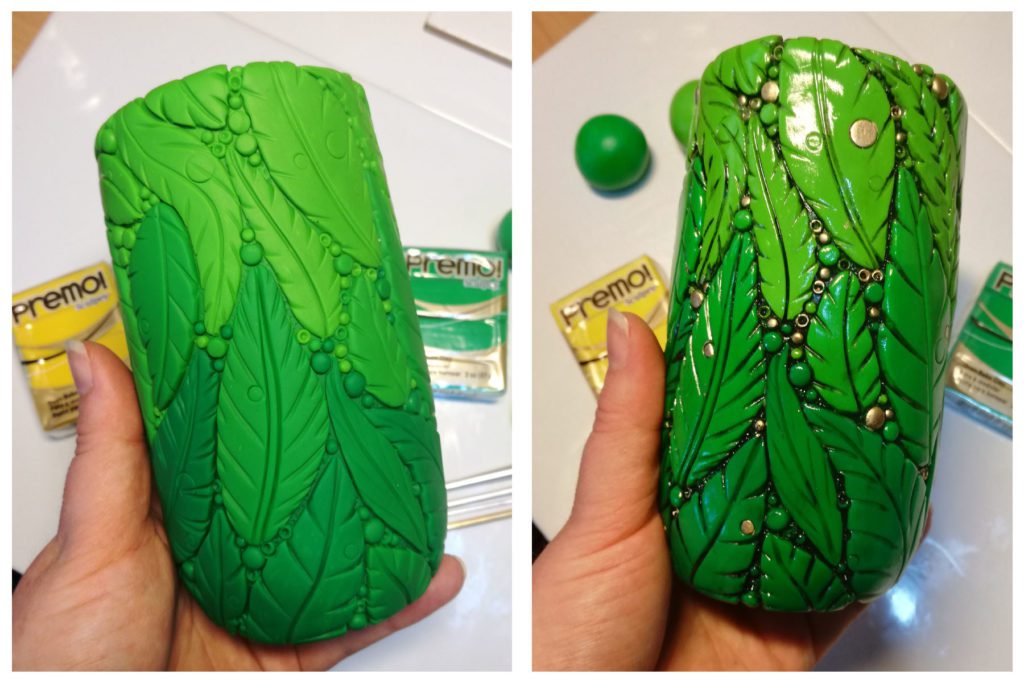
In the picture below I covered a chipped glass with textured blends of green and yellow Sculpey Premo™ and baked it. But it really came to life when I added some watered down black acrylic paint into the all the grooves. A little gold alcohol ink and Sculpey® Gloss Glaze completed the piece.
Similar techniques have been used to enhance the natural colour of the clay used in the images below.
The mushrooms were sculpted in an ecru and white mix, and then some were stained with alcohol inks after baking, while others were lightly brushed with chalk pastels before baking to create an ombre effect. Just remember that many inks are not colourfast and can fade over time.
The skull wand handle was sculpted in white polymer clay and then stained with some black chalk pastels before baking, then painted with some watered down black and yellow ochre acrylic paint after baking. The paint was then wiped away with a damp cloth and lightly sanded. This created a beautiful faux bone effect.
My rock monsters were sculpted in a dark grey scrap clay mix and were then lightly dry brushed with a bit of white acrylic paint to highlight out all the raised areas and texture. The hearts were painted a muddy red, and then lightly dry brushed with a little bright red.

I hope that my before and after pictures will inspire you to bring your paints and chalks out, and to give them a try on your sculptural pieces.
If you’re worried about making a mistake on a sculpture, then why not make a few textured clay pebbles, and just have a play. Deepen those shadows and brighten the high spots (highlights). You’ll be amazed at how a little bit of paint and powder can elevate your work.
Please share your creations with us on social media using the hashtag #HowDoYouSculpey We can’t wait to see what you create.
Happy Claying!
Heather Robertson
