
I have never really painted on clay a lot in my career. I guess I’ve always tried to achieve the end goal through the colors of the clay itself. With that said, I have called upon a couple of my claying friends to shore me up in the areas of clay painting where I am weak. I hope you enjoy their input on this subject as much as I have.
Painting Before Baking:
One major area where clay gets painted on BEFORE baking is through the technique of silk screening on clay. Silk screens lend a great start for inspiration and there are lots of silk screens available for use. When using silk screens on clay, I find it works best to use acrylic paints because the paint is so easy to remove from tools and from the screen itself when submerged in water immediately after use. Silk screens can be used in multiple layers too, creating an abundance of cool backgrounds. Simply roll out a flat sheet of clay, preferably through a pasta machine. Then roll over the clay with an Acrylic Clay Roller too to make sure pasta machine markings are smoothed and to fix the clay sheet to your work surface so it doesn’t move. Burnish the silk screen down to the clay sheet. Squeegee an even layer of your favorite acrylic paint. Lift the screen immediately and place the screen and the squeegee in a basin of water or wash immediately and allow to dry for future use.
Once the paint dries on the surface of the clay, the project can be handled, manipulated, and baked in the oven as usual to cure the clay and to secure the acrylic paint onto the surface. With this in mind, you can paint on the surface of unbaked clay any extra details or highlights before baking if you wish. Just always make sure paint is dry before going into the oven.
My favorite type of paint for silk screen design is an acrylic glossy paint. I think the glossy shine of the paint looks cool on top of the flat background of the clay – especially the flatness of Soufflé™.
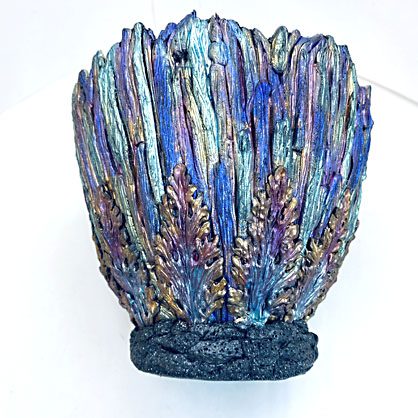
Carissa Nichols shared this information with me about making her intricate, super textured, and highly detailed vases and urchin-like sculptures-
Painting After Baking – Queue the Experts!
Here is where I rely on a couple of friends and their input regarding painting details on baked projects. Each has a totally different technique and super cool results.
Carissa Nichols shared this information with me about making her intricate, super textured, and highly detailed vases and urchin-like sculptures-
Carissa shares that the clay itself was Premo™ metallic colors and that even when painting, the mica in the metallics still shines through. She puts acrylic paints on top of baked clay in lots of layers starting with Golden Fluid Acrylic, then Pebeo Metallic, then a layer of Folk Art Color Shifting, a layer of Golden Interference paint, and finally Folk Art Glitter Glaze. She also shared that she experiments continually with adding the paints in different orders to get different effects. No wonder these pieces have so much intrigue and interest. I feel they can handle all that paint because they are so textural to start with and the paints really highlight that texture. All those details and layers of paint create so much interest in the finished piece


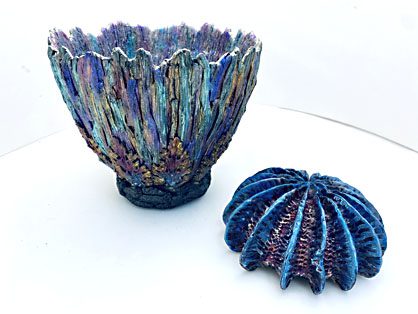
All those details and layers of paint create so much interest in the finished piece.
Miranda Farrand shared her techniques as well. Miranda makes adorable critter sculptures with oven bake clays and highlights the heck outta them after baking with paints. Miranda says that she tries to really hit the mix right with her colored clays before baking to get the intended outcome. Then after baking, she goes to town highlighting. She adds what she calls a “patina” of acrylic paints to fill in and accent details and lines that were already scored into the critter. For this she uses a darker paint like a plum applying it with a brush all over and immediately wiping off excess with a slightly damp sponge. In the photo of the punkuns I love how she adds the shine of Sculpey Glossy Glaze that really makes the eyes shine out from all the surrounding details. For the cheeks and rosy areas, Miranda will dry brush on warm colors in red, pink, or orange to get a healthy glow and brighten the tones.


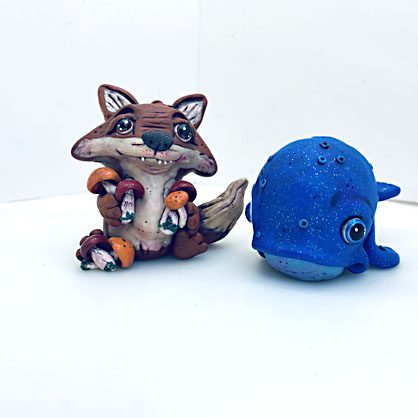
I admire that sometimes for the patina Miranda goes for a super dark color but not necessarily black. This creates a sheen to her pieces that contributes to their overall tone. For the Punkun Plaque, Miranda carried her painting skills right on out to the wooden frame surrounding the clay art making a super cohesive finished design. And aren’t the shiny eyes super adorable in these cute fox and whale critters!
Antiquing Mediums:
Another method of finishing baked pieces is with Antiquing Mediums. These are also considered acrylic paints and can be found in the same aisle with the paints. However, antiquing mediums have a slick oily feel that gives you a little more time to work with them than straight acrylic paints. You can apply the medium over more of the surface before taking it back off with a damp towel or sponge.

I made this tool box over a paper mache vessel. The background is all Soufflé™ and has lots of deep textures. After baking, I worked an acrylic antiquing medium into all the cracks and crevices to highlight the depth of texture. Then removed the medium with a damp towel.
Finally, Paint Pens and Creating Cool Edges:
Paint pens work well on baked polymer clay too. Paint pens are generally not water based and so I apply them after baking the clay and give the paint plenty of time to dry. Paint pens come in lots of opaque colors like Black, and White, and also in many metallics. My favorite brand is the DecoArt pen because it has such a wide angled tip, the paint is really opaque and goes on smoothly. I used it to outline the edges of the baked Liquid Sculpey® Geode coasters shown below.

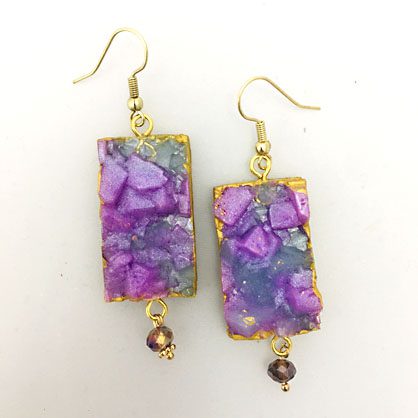
I did a very similar edge highlight technique for the Faux Druzy Earrings shown here, however I applied it with opaque metallic acrylic paint and a paintbrush allowing some of the paint to spill over onto the top surface of the design.
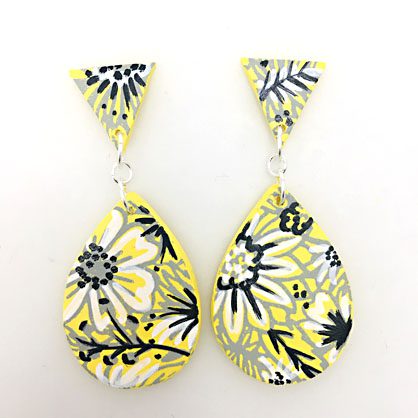
Finally, the yellow earrings below were silk screened before baking with silver metallic acrylic paint. After baking I highlighted some areas of the design with fine line Sharpie White and Sharpie Black paint pens, allowing the paint to dry between color applications.
The possibilities for adding details to your oven bake claydesigns are simply endless when you add the dimension of paint. Start with some acrylic paints that coordinate well with your current project and see where it takes you. Applying paint to baked clay pieces gives you a lot of control for applying as much paint as you dare and removing as much paint as you wish.Share your projects with us by using the tag #HowDoYouSculpey and please use tags like #Premo or #SculpeyIII so we can follow you on social media.
As always, having fun rolling clay,
Amy
